
Mustang Motor X
12/30/06
Mustang Motor X
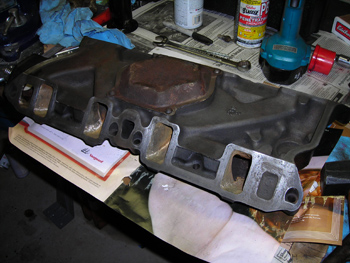
I finally finished porting the intake manifold to match the profile of the gaskets. The ports on the stock heads were much smaller than the openings in the new aluminum heads and the gaskets that would seal it all together. There was a lot of cast iron to grind off, but now the intake should flow a little more air!
After washing the intake with some soapy water to get rid off all the iron filings, I wanted to heat the intake up a bit to dry out the cast iron and keep it from rusting too badly. Since I had a nice fire going in my living room, and my wife wasn’t home to see car parts migrating into our house, I left the intake on our wood burning stove for an hour.
The two gaskets were put in place after everything was cleaned and made ready for the intake. 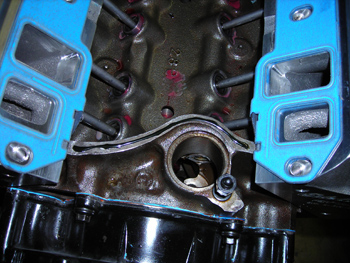
There are several ways to deal with a problem area in the sealing of the intake gasket. Some people do not use the cork strip that seals the area on either end of the intake valley and choose to use a bead of silicone sealant. I decided to try using the supplied gasket, but under advice, glued it in place with weather-stripping adhesive. Once the cork gasket was firmly glued in place, I daubed a bit of silicone on the four corners where the gaskets meet, and the intake was carefully lowered into place. I have my fingers crossed for no oil leaks, so help me by crossing yours as well!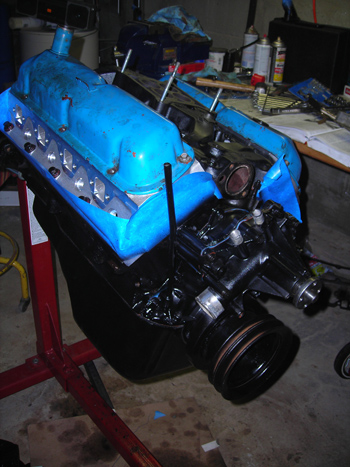
I temporarily reinstalled the old valve covers and masked the aluminum heads to prep the block for painting. Some of the parts were painted gloss black before I installed them, but now I could paint everything together to match. A 1965 V-8 Mustang had their blocks painted black, so I’m lucky because I think it will look great in contrast to the aluminum heads and valve covers I will be installing.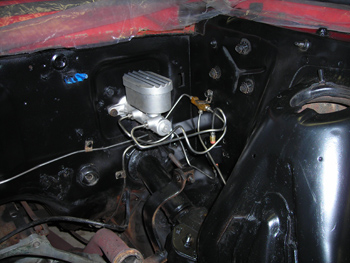
With the engine rebuild, I’ve decided it was time to make the Mustang a little safer in the braking department. Years ago, I upgraded the Mustang to front disk brakes. At the time, I simply reused the single bowl master cylinder, but this was a good time to convert my brakes to a dual chambered master cylinder. With the old system, if any of my brakes lines failed, or lost pressure, I would have no brake pressure to stop the car. With a dual reservoir master cylinder, there was a bit of redundancy to better my chances at stopping. It might not be stock, but well worth the upgrade. I found a nice looking master cylinder at http://www.mpbrakes.com/ that was less than $100 bucks, way cheaper than the $420 bucks Stainless Steel Brakes wanted for a billet master cylinder! It even matched the new valve covers after I spent some time to polish the raised ribs of the cover.
As the engine comes together towards completion, I still have a long list of things to do. As they say, the devil is in the details! My list of things to do include, getting a brass National Pipe Thread adapter to fit my water temperature sender. I need to find out what spark plugs to get for my new heads since they are not the same as what came on my Ford. I also need to buy new carb gaskets, pvc valve and hose, ring gear, and thermostat. There’s still a bunch of parts that still need painting, from throttle linkages to battery trays. Every time I turn around, I find more little things to paint, but it’s slowly getting done.
Previous Restoration Day
Next Restoration Day
Home page
Blog

Forum

Resource
