
Grinding and Buffing. Buffing and Grinding

September 10, 1999 Grinding and Buffing. Buffing and Grinding.
It was too rainy and humid to paint the engine compartment today. After all the sanding, and preparing of the engine compartment, I decided not to rush the painting, and have all the humidity affect the final paint work. Hopefully next week will be sunny and dry, and the masking and the painting of the engine compartment will begin.

Instead of painting, I decided to try out my new home-made buffing stand. “Eastwood Co.” wanted over $170 bucks for a nice steel stand, but I need to save my money for Ferrari parts! (Fred Petroski wants $500 for my missing heater box!) I drew up some plans for my buffing stand last week, and asked the carpenters at my job to help me cut the wood. I normally would have cut the wood myself, but I’ve discovered if you look pathetic enough doing something in front of a professional, they’ll usually volunteer to do it for you! I found some scraps of 3/4 inch plywood, and 2x4s and soon, I had a buffing stand. Total cost? $0.00!
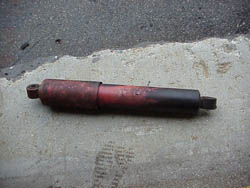
I had a pile of parts that needed to be stripped of rust and paint, so I put my new buffing stand to good use. Of the four shocks, one, maybe two, were good. The questionable one has a slightly rusty piston rod, which will ruin the shock seal given enough time for use. I took as much of the rust off with steel wool, and am going to look for another rear shock. The one good front shock got stripped of rust and paint, and will soon be painted “Chevy Orange” for that “Koni” look.


I swapped the grinding wheel for the new buffing wheel I got from “Eastwood Co.” I’m restoring my Nardi Steering wheel, and have already stripped all the old varnish off the wood part of the wheel. Before I start re-applying new varnish, I need to polish the aluminum spokes. The wheel isn’t too badly oxidized, but has that milky look aluminum can get in certain spots, so what better time than now to learn how to buff aluminum? I bought the “aluminum buffing kit,” and it came with a short pamphlet explaining the basics. I have a sneaking suspicion that the art of buffing is another one of those crafts that can be easily explained, but will take a lifetime to master! I got pretty good results right from the start, but progressively got worse as I continued!? The first wheel, the spiral sewn buff, with the tripoli compound worked well in taking out the haziness of the aluminum, but I seemed to be working backward when I switched wheels. I went to the flannel buff with the white rouge compound, and the haze seemed to return! I tried different amounts of pressure, and compound, and finally found a combination that seemed to work. Now that I have a nice mirrored finish on the steering wheel, I really notice some of the really fine scratches. I guess I’ll have to start all over to get these scratches out!
Previous Restoration Day
Next Restoration Day
Ferrari Home Page
www.tomyang.net
Blog

Forum

Resource
