
Wiper Motor Saga

6/23/00 Wiper Motor Saga

The wiper motor has consumed many hours of the time in my restoration. I spend not only time at the shop trying to figure it out, but any idle time I have at my real job is spent thinking about what I’m doing wrong. I needed to figure out what was broken with the wiper assembly before I could fix anything. Fixing the gear box eliminated that as a suspect, so it now was either a wiring problem, or a motor problem, but getting the motor to run was not successful.
I was at a Concours d’elegance in Connecticut a few weeks back and met a guy named Kevin who worked for Steve Tillack, an owner of a Southern California restoration shop. After sharing my wiper motor woes with him, he suggested calling his shop and asking for Gary, their restoration guy. Gary seemed helpful, but explained that they have similar troubles fixing wiper motors, and that they could probably fix by motor if I sent them the switch, and the motor. Besides sending me the wiring diagram that I already had, he didn’t know what else he could do for me. After getting off the phone, I was a little frustrated, but also relieved that even the professionals were having trouble in this area.
Speaking/crying to some more friends of mine in the Ferrari community about my wiper motor, Bard Wolfe assured me that getting the Lucas motor to run was not that hard, and a little logic would get it to run. With that piece of advice, I was determined to make that *&%#! motor run.

During the week, I reviewed how I hooked up my motor on the bench, and the possible reasons why it didn’t run. I accessed information on DC motors in my mind from childhood and had a revelation! I wasn’t supplying power to the magnet! A motor needs to have power across the brushes AND a magnetic field in order to work! As soon as I got up to the shop, I popped open the case and found the two wires that create the magnetic field and added them to my battery. IT WORKED! So here’s the movie of the wiper motor! (click on the picture!)

I tried to carry my excitement into wiring up the motor to the car’s electrics, but was soon thwarted by the mismatched wiring. Now that I knew the motor worked, it was obvious that the wiring was wrong because nothing worked when I followed the color coding supplied by the owners manual. The Lucas unit has different colors than the Ferrari harness, so I now have to figure out which combination will work. This is complicated even more because although I got the motor to run, I still don’t know what speed I have, nor how to get another speed. Other combinations of wiring didn’t give me any movement.
I decided to leave this project for another week. You can rest assured I’ll be spending the week obsessing some more on this $#@*! motor!

Another piece of advice I followed this week from the Ferrari community came from, Kerry, a fellow restorer. He mentioned that he made his own square nuts to use as cage nuts for his restoration. It’s a pretty simple procedure, so I tried making one for the seized one I wrestled out of the window channel a few weeks ago. Luckily I had a piece of bar stock I bought from Home Depot laying around the shop. It was the same thickness as the nut, so:
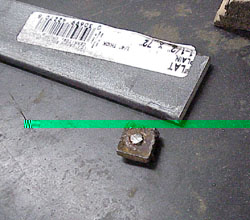
I marked the bar with the size of the nut.

I cut the bar with a hacksaw.

I filed the nut as close to square as I could, and center punched it.

Drilled out the center with a bit one size smaller than bolt.
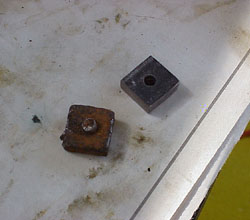
Now the homemade nut is ready for the final drilling, and tapping with a metric tools. All I had were SAE sizes, so I felt it was smarter to get everything close, and have François do the finishing work. I can’t believe how proud I am about a little nut!

I laid out all the pieces I’m sending to get chrome plated. This will be my reference so I make sure all the pieces I send will come back!
![]()
Not included in that picture is the gear shift lever, which I began removing today. The rod is a simple device attached to the top of the transmission. There are no rods or long linkages to make the shifting vague or sloppy, but there is one bushing that can cause some problems that François wants to check. He told me to remove the shifter assembly and bring it to his shop so he could remove the lever and inspect the bushing. When I took the inspection cover off, I noticed a lot of crumbs inside the shifter assembly. This was probably what is left of the suspect bushing. François machines new ones out of teflon.

* By the way, My nephew just helped me out in redesigning some of my website, and we’re testing out some of it’s features. The main thing I wanted was a searchable database, and this was his answer. Let me know how you like it, and if you find any problems! Tom
Previous Restoration Day
Next Restoration Day
Ferrari Home Page
www.tomyang.net
Blog

Forum

Resource
