
Brakes, and Aluminum

6/8/01 Brakes and Aluminum

I continued on the front suspension by installing the front left rotor, and brakes. All the cotter pins were installed a couple of weeks back, so I was read to do this side. François still needs access to the right side suspension to do some minor adjustments, so that side will have to wait until he gets a chance to work on it.
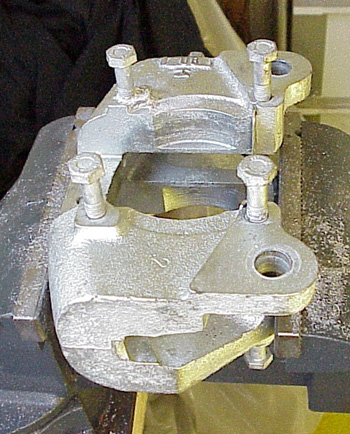
The front caliper mounts were nickel plated several months ago, but still needed a little work before installing. The bolts that secure the caliper pistons were plated as well, but the excess needed to be removed so they wouldn’t cross thread. I also wanted to chase the threads in the caliper bodies to make everything fit nice and easy. I automatically reached for my metric tap and die set, but soon remembered these calipers were made by Dunlop, an English manufacturer, so I needed SAE taps and dies.

The bolts cleaned up on the wire wheel, and all the threads on the calipers were cleaned and tapped. Before installing the piston bodies, I coated all the threads with anti seize, so the next person who restores these brakes won’t have as hard of a time!
The internet can be a great thing, but it can also cause a lot of problems. I’ve gotten a lot of great advice in helping me make these exhaust shields, but I’ve also gotten so much advice, I’m not sure which way to go! I found out that the Aluminum I bought last week was 5052, and is an alloy that is malleable, but needs a lot of annealing to work right. François says I should get pure aluminum which I found to be called 1100. 3003 has also been recommended by another expert, but some annealing will also be needed.
Pricing the aluminum has also been very confusing. I figured out I would need a piece of aluminum 24X36 in size to finish this project. I can use the aluminum I already bought for the inside piece that does not get bent, and use only the new piece for the sharp bends. The sheet metal place wanted $40 bucks for a piece that large! After checking at some mail order places, I found one to have a variety of aluminum for about $17 bucks a sheet. Hopefully they won’t have a minimum order. Now all I have to do is decide which alloy to buy!

Until I put my order in I decided to mess around a little with the stuff I already have, and try out some of the wood bucks I made. I cut some scrap pieces of 5052 and clamped it in one of the tight radii I would need to make. After I bent the aluminum a bit, I took a propane torch, and heated it up. A friend of mine lent me a welder’s crayon that melts at a specific temperature. This one melted at 650 degrees. I got the aluminum a little hotter than 650, and let it completely cool, and bent it some more. The results weren’t bad, and certainly better than last week’s disaster. François had me try this with a piece of scrap 1100 he had laying around, but this time without annealing. I had similar results.

This picture (above) shows the 5052 with a slight stress crack. It began from a burr that I didn’t remove before I began stretching the aluminum. The annealing, however, allowed the rest of the metal to stretch evenly around the curve.

The 1100 series aluminum did almost the same thing at a similar burr, but I stretched this stuff without any annealing. Obviously the 1100 stuff is more forgiving, so it will probably be the stuff I buy. I’ll put an order in on Monday!
Previous Restoration Day
Next Restoration Day
Ferrari Home Page
www.tomyang.net
Blog

Forum

Resource
