
Painting Resistors, and Fixing a Dipstick
8/14/01
Painting Resistors, and Fixing a Dipstick

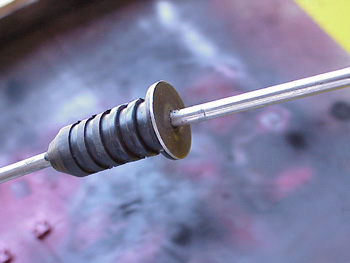
Parker Hall from Kilimanjaro Designs, a Ferrari Detailing Parts company (see Suppliers page), has been reading through my restoration, and caught a small detail I missed. He noticed my resistors had not been painted when I was detailing my coils several months back. He said to go ahead and paint them the same red color as I had painted the coils and I would be fine. Today was as good as any to paint these parts.


As simple as these pictures look from “before” to “after,” it took several steps to get from point “a” to point “b!” The resistors had to be removed, partially taken apart, stripped of old paint, masked, and painted with two coats. I marvel in the hours it takes to restore a car from the ground up!
Since I was working on all the little details on my car, I decided to fix a problem I had with my dipstick. The top steel collar that keeps the stick from going too far down into the sump pan has become detached. I believe this part was part of the rubber plug that you see here, however the rubber part that holds the steel collar has broken off. I glued the pieces together, but felt that after a couple of insertions of the dipstick, the collar would break again. The solution was to add a small tack weld to the top of this piece holding the collar firmly in place. MIG welding would probably be the best because it’s precise, and operates in short bursts that it will burn less of the rubber on the other side. The only problem was, I don’t have a MIG welder!
Asking around the auto body shops, and parts stores, I was told of a place near my shop that does welding, so I stopped in for a look. I showed the owner my dipstick, he carried it over to his welding bench, fired up the MIG welder, and put two tacks on the collar. I quickly carried the smoldering dipstick over tot he sink to cool off the burning rubber, and looked at his work. It was not going to move again, so I asked him what I owed him. As he started back to what he was doing, he waved to me and said “Don’t worry about it!” I graciously thanked him, and left his shop. Nice guy!

When I got back to my shop, I had a closer inspection of the work. The weld is a little thick, but I can always grind off what I don’t need. In fact I pulled out my Dremel tool to begin removing some of the weld.

Now that the dipstick is fully functional, I decided to clean up the handle. It has its share of scratches, and gouges from living in the engine compartment. Using the Dremel, and some fine sand paper, I carefully removed the deep gouges, and scratches. After that, I hand sanded the handle much in the same way I did the shift knob, slowly working the aluminum into finer grit sandpaper. The next step was the buffing, which shows off all the patient work I put into all the other steps!

Here’s a piece I will be proud of whenever I go to check my oil!
There won’t be a Friday restoration day this week because I’m heading out to California for the Monterey weekend of “car stuff!” Look forward to a complete report when I get back, but first I’ll have to survive the red-eye so I can go to work on Monday! I hope to see lots of Ferraris, and their owners. It should be a fun time!
Previous Restoration Day
Next Restoration Day
Ferrari Home Page
www.tomyang.net
Blog

Forum

Resource
