
Exhaust detailing, and Wiring

2/1/02
Exhaust detailing, and Wiring

Today, I followed John’s advice and smoothed out the rough edges on the y-pipes before final painting and installation. I took a ball peen hammer, and hammered the edge of the pipe tight up against the flanges. After that, I took a die grinder, and ground away any extra welds inside the pipe to give the exhaust gases a smooth flow.

Although I’m not really gaining any appreciable horsepower doing this extra step, it gives me the knowledge that I did a nice job on these pipes. Besides, power is built in an engine a little at a time, and every little bit adds to the whole product, so when my V-12 is humming along at 7000 rpm (O.K., maybe I’ll only be brave enough to take it to 6700), I’ll know I did the little extra to help her breath right!
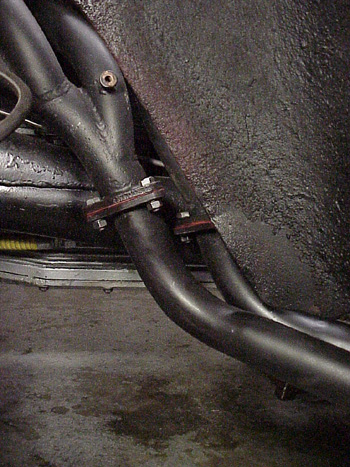
Here is one of the header pipes installed. I used stainless steel hardware, a copper gasket, and some RTV to insure a good seal. Both y-pipes look great, and now fit perfectly, and the system is hung! I still need to have a few hangers welded to the left side frame so the front section of the exhaust is adequately supported, but the system is ready to drive temporarily!

As I was waiting to for the paint to dry on the exhaust y-pipes, I decided to tackle a problem I noticed with the headlights last week. The lights seemed to be working opposite to what should be where the high beams were on when the low beams were supposed to be on. I checked my wiring diagram, to make sure I had everything hooked up right. I soon realized that I had the headlights wired in wrong, and reversed the high beams with the low beams. Luckily, all I had to do was pull the blade connectors out of the socket and reposition them in the correct place. This can be tricky if you don’t know how the three prong headlight is wired. With today’s assortment of halogen bulbs, these three pronged bulbs are all gone from modern cars even though it was the world’s standard 20 years ago. Here’s a diagram if you ever need to wire one up. I had to write on the back of the bulb as I tried to figure it out, but I made it clearer with Photoshop!
I also added an article Jonathon Brent wrote on how to build a V-12 head puller, and an article I wrote about what to use for lubricants on a Vintage Ferrari. These articles and others can be found in the Restoration Tips section.
Head Puller
Lubrication
Previous Restoration Day
Next Restoration Day
Ferrari Home Page
Blog

Forum

Resource
