
Parts Fabrication and More Suspension Progress
4/12/02
Parts Fabrication and More Suspension Progress
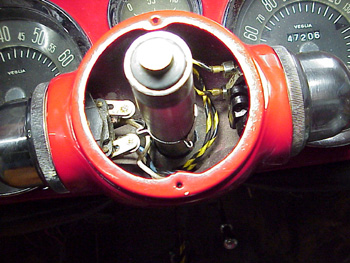
Several months ago, I had my steering column painted. Since it was more of a favor, it took some time to get it done. Unfortunately in that time, the cap piece that fits over this steering column got lost. Wayne offered to have one of his fabricators remake the part for me, but I felt bad about him losing money on a favor, so I decided to make the part myself. Besides, I’ll still need Wayne at Continental Autobody (see suppliers) to paint the finished part!
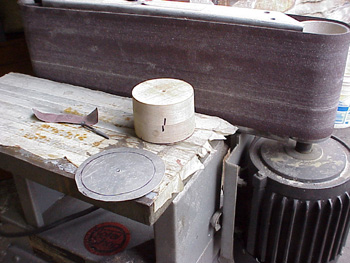
The first step was to get some wood for the buck. Always the scrounger, I picked through the wood pile at work, but couldn’t find any hardwood, so I actually p-p-p paid for some scrap wood! I bought $5 bucks worth of maple, drew circles in the two pieces, and cut them roughly to size with a jig saw. On the belt sander, I formed the two pieces into perfect circles. (You can see the aluminum sheet ready for forming in the foreground)
Before I headed up to the shop, I watched the videos I bought a few months ago on metal forming. I wanted to try a new technique, so I had to do my homework! When I made my exhaust shields last year, I cold formed the aluminum and annealed the metal as I went, but a faster technique is by hot forming. Since François has a oxyacetylene torch, I figured I would give this a shot.

The hardwood was needed to withstand the heat and the pounding of the forming hammers. The aluminum needed to stretch and shrink in various places, and the heat helped persuade the metal into place. It didn’t take long for me to get a good feel for the materials and techniques.
After the forming was done, I filed and sanded all the tool marks away, and the inspected my work. It’s do very nicely in its new home after some paint!

After the diversion of the steering column cap, I returned to the rear suspension assembly. Again, pictures does no justice to the pain and struggle involved with this process! There are so many instances where one is in extreme danger when working back there that caution must be taken every part of the way! At the end of the day, I managed to get the leaf spring in position and bolt together the spring plates. Next time, I’ll hook up the brake lines, and install the shocks, but I’m in the home stretch!
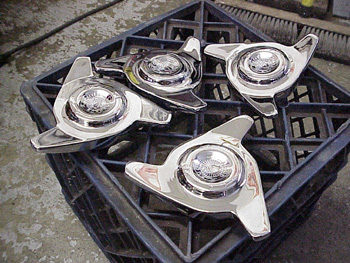
I got my knock offs this week from Cork Adams at Precision Wire Wheel (see suppliers page)! The total cost was about $350 to refurbish my old knock offs plus shipping. It’s usually about $75 bucks each to rechrome a knock off, but one of mine needed the engraving redone after the rust was removed. Considering new knock offs can cost anywhere from $250 and up, this was a bargain for a set of knock offs that look brand new.
Previous Restoration Day
Next Restoration Day
Ferrari Home Page
Blog

Forum

Resource
