
Progress Under the Car
4/16/02
Progress Under the Car

Well, that’s it! The rear suspension is DONE! I installed the shocks, hooked up the brakes, and bled the lines. I’ve got good pedal pressure, and things are looking pretty good. I just have to fill the rear differential with gear oil, and I’ll be all finished. I can’t believe this whole fiasco cost me 2 months! Oh well. onward we go!

In order to keep the rear suspension bushings well lubricated, and to prevent my having to go back in there in my lifetime, I’m going to replace all the old grease fittings (left) with a conventional zerk fittings (right) The old ones are for winning concourse shows, but don’t work too well. You need a special adapter, and it really isn’t worth the hassle. I’ll put them aside for someone else to mess with!

A little side note I wanted to point out when you do your brakes. The brake fittings are often reused if they’re in good shape, but they will sometimes deform a bit on the end that presses against the double bubble flare. You can just see how the end of the fitting is slightly wider than the threads. This will cause problems when trying to screw this fitting into the female end of the brakes. Carefully file this deformity off, and everything will fit nice and easy.

After I got the rear suspension in place, I hung the exhaust again. Everything fit well, and it looks pretty even out back, but I found a new place that was bumping up against the exhaust.
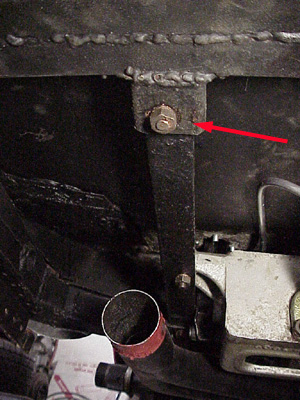
After some poking around, I found the culprit to be a nut that holds the brake pedal assembly to the bottom of the frame. You can see the front y-pipe at the bottom of the picture. The muffler would bump up against this nut and rattle right below the driver’s side seat. François had two suggestions, one, was to turn the bolt around so the thinner head might give more clearance. The second piece of advice was to dimple the muffler slightly to clear the nut. Since it is on the top of the muffler, no one but you and me would ever know about the dent.

You can see the flipped bolt bought me some room, but it still wasn’t enough for me to feel the rattle would completely go away, so I marked the muffler for the dimple.

I could barely bring myself to dent the pristine stainless steel muffler, but I really had no choice. Making adjustments anywhere else would ruin the clearances in other places, and upset the way the tailpipes exited in the back of the car. I’ll spare you the gory pictures!
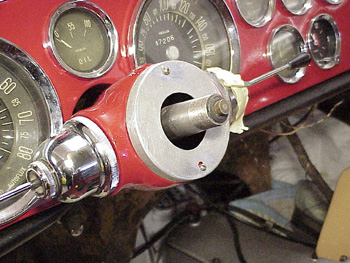
Last week I showed how I made the cap piece for the steering column, and this week, I did the final fitting. I screwed up one of the holes (the bottom one), but hopefully some paint and filler will hide my flub! I guess I should have measured twice! I’m such a bone head!
Previous Restoration Day
Next Restoration Day
Ferrari Home Page
Blog

Forum

Resource
