
The Windshield is IN!
10/4/02
The Windshield is IN!
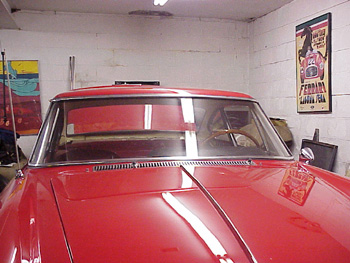
Sometimes with a restoration project, things move excruciatingly slow, and then there is a burst of activity. Today, the windshield finally went in after months of struggle.
I arrived at the shop today to find François preparing my windshield with another gasket. François had a 250GTE gasket for a client that came from another vendor. He decided to see if this gasket would solve my problems first before resorting to the next step. Here were the steps:
1. slip the glass into the channel of the gasket. Use some lubricant to make it easier to fit.
2. With more lubricant, press the chrome trim around the windshield. (I’ve seen people do this after the installation of the glass, but I wasn’t about to question François!)
3. Run sturdy cord inside the lip of the gasket that will pull over the pinch weld of the windshield opening.
4. Place the glass onto the car, trying to get the bottom lip to hook onto the pinch weld.
5. Using flat tools, and hooked tools, get the bottom of the gasket into place.
6. Constantly check for alignment of the glass to the body, the chrome trim to the gasket, and the gasket to the body.
7. Start pulling the cord to pull the lip of the gasket over the pinch weld.
8. Go slowly so you can check for alignment, and to gently press the glass into place.
9. Once the cord is completely free, check for fit, and adjust if necessary.
François’ experience dictated whether we could begin, or if the glass had to come out and be adjusted to the gasket or chrome trim. The fit was much better with this gasket. There was still a gap between the gasket and the body, but the material of the gasket made up the difference.

The worst fit was the right side of the windshield, but it’s the best we’re going to get.

With the windshield in, I affixed my registration stickers! I don’t think I like where I put the square one, but luckily it’s a temporary one, so I’ll do a better job with the new one.

François had an extra set of air cleaners laying around, so he let me install them in my air cleaner. As I installed them, I noticed they had a raised lip that prevented the cleaner from closing down tight, so I trimmed this lip down with a razor blade.

Now I ready for some driving!
I really wanted to take the car for a ride, but several things were preventing me. First off, it was raining, and although a little rain won’t hurt anything, I certainly didn’t want to spin off the road while I was getting aquatinted with my Ferrari! The second problem, was François was extremely busy and his shop was packed in with cars. The car that was in my way was on jack stands getting its brakes done. The final problem was that I accidentally took my new needles and seats for the carburetors back to NYC last week instead of leaving them with the car. Before I drive my car for any real distance, these seats need to be replaced. François and I didn’t think it was going to be this easy to address the windshield, so not bringing them back to the shop was not an issue. The plan is to bring the needles and seats back up next time, install them, and GO DRIVING! I wonder if I can sneak up to the shop one day next week….
Blog

Forum

Resource
