
Smelling More Gasoline
11/22/02
Smelling More Gasoline
The first order of business today was to take another look at my fuel leaks. My intentions were first to go for a drive to run the gas level down a bit so I could work on the fuel pump, but it was a wet and rainy day, so I was left to drain the gas out of the tank. Luckily there is a drain plug at the bottom of the tank, so I got about 10 gallons out before I began addressing the leak. I got the fuel pump out, and found the check valve fitting did not have teflon tape on the threads, and the red gasket below it was not sealing right. At least that was what I could figure was leaking. When everything is in place, it’s very hard to see exactly where the fuel is coming from, but you can make out the general area of leaks. I resealed the fitting, installed the pump, added some gasoline to the tank, primed the system, and waited. After letting everything sit for about 30 minutes, I didn’t see anymore leaks. The true test will be to fill the tank back up with gas, and let the pressure of a full tank show if there are anymore leaks.
Now that I had a partially filled tank again, I could take another look at the fuel sender. My fuel gauge doesn’t seem to move higher than a third tank.

I borrowed a lipstick camera from work that has a “fisheye” lens that can get in some real small places. I bought a LED pocket light that is very bright, and yet small enough to fit in the gas tank with the camera lens. I promised the guys at work I would return the unit unharmed, but it’s such a cool camera, I’m thinking of using it on other places on the car! Just think of the possibilities!
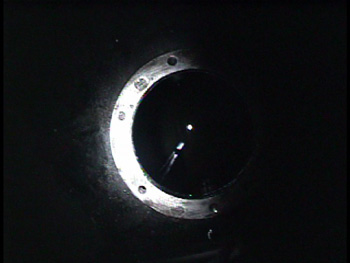
Here’s what the camera showed inside the gas tank. (click on the picture). The quicktime move is very dark, but the video that my camera recorded is much better, and told me a lot. The interior of the gas tank is red because it’s coated with gas tank sealer to keep it from rusting.
In the movie, you can see the baffle that is keeping the sender from working. It extends all the way down on each side of the tank, but what I didn’t know was that the top of the baffle extends down a few inches from the top of the tank. This kept the sender from showing anything higher than 1/3 of a tank. I had to bend the float arm in a way so it wouldn’t get caught by the baffle and give some kind of a reading for my gauge. I realize it won’t be totally accurate, but it’ll be better than what I had.

Here’s a drawing of what’s going on inside the tank. The black arm is getting caught by the baffle, but the red arm with the bends, clears the baffle. It’s not a very accurate drawing, but you get the idea.
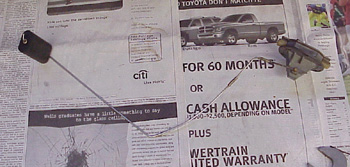
Here’s the sender with it’s new shape. It’s not pretty, but I think it’ll work better than before.

Here are some pictures the exhaust hangers I got welded onto the chassis last week. With the car up in the air for the fuel pump, I went ahead and drilled the holes to attach the hangers.

It’s getting pretty muddy up under the car! It’s further proof that I plan on driving my car.

Here’s the 56th picture of my exhaust system, and it’s pretty much done. I might bend that muffler tab just a bit to make the hanger line up straight, but the exhaust is finally complete.
Blog

Forum

Resource
