
Finishing the Carpets!
3/26/04
Finishing the Carpets!

Now that all the carpeting has their binding sewn on, I can attach the final pieces of jute backing. The jute was cut to fit each piece of carpet and attached with contact adhesive.

I also had to make the dead pedal for the driver’s foot well. This car has an area where you rest your left foot when it is not on the clutch, and is covered with a rubber matting material much like the other pedals. When Frank sewed the carpet binding, he mis-read the marking, and forgot to sew on this matting to this carpet piece. Since he was out of the shop when I was working on my carpets, and I was too impatient to wait for him to return, I decided to try sewing the matting myself!
After practicing on some scraps long enough to get a nice straight stitch, I tried my skill on the real thing. I remembered to lock the stitch in at the beginning and end, and even managed to get a straight line!

When I installed the pieces into the driver’s foot well, I was pleased to see everything lining up correctly. The dead pedal looks great, and when Frank returned, he thought I did fine without him! Looking at this picture however, shows plenty left to do. The kick panel next to the dead pedal still needs to be screwed into place. The fresh air vent that was painted to match the carpet still needs to be attached, and the parking brake boot still needs to be installed. Will the list of “to-dos” ever end!?

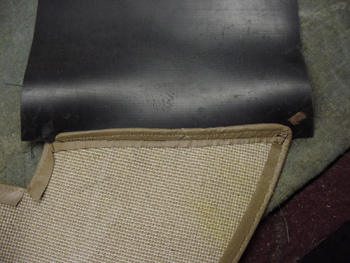
The leather heel pad on the previous picture looks great, but as I said last week, it will wear out pretty quickly if I plan to use it as my only floor mat. I plan on using a rubber heel pad for normal driving, and will remove this “throw rug” if I show the car, but I felt the burlap backing of the throw rug would also be too rough on the leather heel pad below, so I wanted to cover the back of the throw with something softer. I felt even the jute I used for the carpet backing was too rough, so I decided to use headliner material!

This material is made of a fine synthetic material that has a foam backing. My leather heel pad is now safe from scuffing!

Many of the carpets are attached to the floor of the Ferrari with snaps. This facilitates removing the carpets if things get wet, so I had to gather all the bits required to install snap fasteners.

The rings that push through the carpets hides very nicely in this cut pile carpeting. You can just barely see the one attached to the carpet on the right. It helps to pick the fibers out from under the ring as you wiggle the three teeth into the burlap.

On the reverse side, the female end of the snap is held in place with the three prongs of the ring. The jute was cut back so the snap could be attached to the carpet.

Inside the car, the male end of the snap is screwed into the floor pan of the car. These plastic spacers raise the snap so you have clearance for the layer of jute on the back of the carpet piece. Ferrari used aluminum spacers, but the dissimilar metals and high moisture caused these to rot away. These nylon spacers will be here longer than the car!
Each snap is screwed into the floor before the female ends are attached to the carpets. The location of each snap was checked, and double checked so the carpets would sit correctly when it was installed, and by the end of the day, I had all my carpets installed!
Previous Restoration Day
Next Restoration Day
Home page
Blog

Forum

Resource
