
The Dashboard Comes Out…Again!

4/16/04
The Dashboard Comes Out…Again!

With the interior nearly completed, I found myself taking everything apart! I needed to take the dashboard out so I could do a better job on the leather. When Frank saw the dash several months ago, he saw no other choice but to do it again. �With the amount of time you put into your seats, you can’t let the dash go looking like that!� Even though it pained me to take all the gauges out, I listened to Frank, and began the disassembly.

After labeling all the wires, I lowered the steering wheel, and pulled out the dash. It’s amazing how I took a perfectly good looking interior, and made it into a complete wreck in a matter of a morning!

Once the dash was on the bench, I drilled out all the pop rivets to get everything apart.
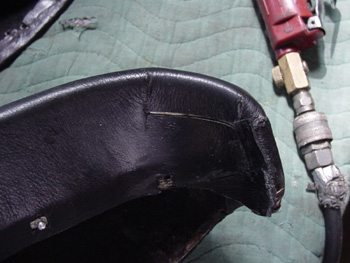
Here’s an example of the less than quality work of the previous upholsterer. The driver’s side of the dashboard has a leather covered hood that should be made from one piece of leather. Whoever tried to cover this dash the last time chose to take some short cuts. When looking at the underside of the gauge pod, we can see these patches and cuts made into the leather. It takes a lot more work, and skill, to get one piece of leather to stretch over this shape, but it was easier to make a cut in the leather, and patch it all in place. Pininfarina managed to do this dash with one piece of leather, so we will be doing it the same way. There will be no short cuts with this dash!

Even though the previous upholsterer did a crappy job of covering the dash, he certainly didn’t use cheap glue! I pulled, pried, and yanked on this piece of leather until my fingers bled, but eventually it came off the aluminum shell. I’ll need a couple days for the skin under my finger nails to heal before I do any more pulling!

After the old leather was removed, I took the old glue off with solvent, and sandpaper. It’s now ready for new leather.

As the passenger side of the dash was inspected, we found another strange modification. The nose of the dash originally had a soft pad, but the previous restorer replaced the foam with a fiberglass piece. They fabricated the shape with a hard crumbly foam and
covered it with a layer of fiberglass resin. When covered in leather, this dash would have a hard feel to it, but would crush and crack if any pressure was applied. This was the wrong material to use in this application, so we had to make a new pad.

I used a closed cell foam that has a nice resiliency to it, and shapes very easily. I began by layering sheets of foam until I reached the thickness of the original pad.

After cutting a rough shape with a sharp knife, I did more shaping with a disc sander. The final sanding was done with a sanding block so I could maintain a straight line on the dash. I’ll have to make one more piece for the opposite side of the dash, but that piece will have to wait until next time.
Previous Restoration Day
Next Restoration Day
Home page
Blog

Forum

Resource
