
Cleaning Carb Floats
5/17/07
Cleaning Carb Floats
As I awakened the 330 America after her 18 month sleep, there have been a few issues to address. One of them has been stuck float needles in the Weber carburetors. Showing how to unstick these needles comes at a good time, as the GTC/4 with the bent rod I’m working on was the result of a stuck float.
When fuel is left to sit inside a carburetor for long periods of time, the volatile stuff evaporates leaving behind residues that cause the float needles to stick and clog up the rest of the carburetor. Even with the use of fuel stabilizer, I had sticking floats, so there really is no avoiding this except for driving the car on a regular basis.
To get to the carburetors on a 250, 330, or 365 engine, first the air cleaner has to be removed, then the two yellow fuel lines need to be disconnected from the fuel rail. The next step is to unbolt the banjo fittings on the fuel rail from each carburetor. Be careful when removing the fuel rail as some cars have a fine mesh screen that fits inside the banjo fitting. The red fiber washers on the banjo fittings are concours correct, and reusable, but the copper washers are not and should only be used once, unless you anneal them. I soak the red washers in gasoline or carb cleaner while I work on the carbs so they swell a little before I put them back on.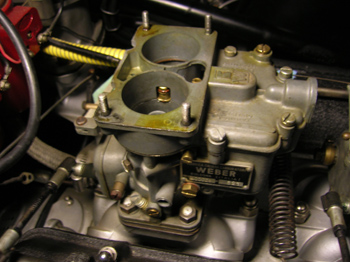
Remove the screws that hold the top plate of the carb to the carb body, but leave the brass screw that has the “I” and “E” marking. That screw will stay in place as the top plate is removed. (You can see the stains the fuel left on the top of the carb when it overflowed.)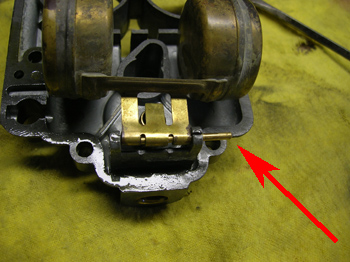
Try your best not to tear the gasket or catch it with the float when you pull off the top of the carb. When you flip the top over on your workbench, you’ll see the float assembly and how it pivots on a brass rod. Take a rod of similar thickness and push it out to release the float assembly.
With the float assembly out of the way, you’ll see the brass needle valve and valve body. turn the top plate over, and let the needle drop onto a soft cloth. If you have old needles and seats, now is the time to replace both of these parts with new parts available from the usual suspects. Mine have seen very little mileage since I replaced them, so I just needed to clean them.
Clean this needle with carb cleaner, along with the needle seat assembly. Any debris or residue on these surfaces will cause your carburetor to leak, so clean everything thoroughly, and make sure it stays clean until reassembly. Assembly is in reverse order.
With the concerns of hydrolocking an engine, people have been asking how to prevent this from happening on their car. Here are a couple thoughts. Firstly, in order to hydrolock an engine and bend a rod, several factors have to be in play for this to happen. Some of these factors could be avoided, while others are just be bad luck. When a cylinder fills with fuel, the corresponding intake valve has to be open. When the engine is turned over, another cylinder fires and tries to rotate the engine. The force of this ignited cylinder is what forces the piston with the fuel in the cylinder to break or bend a rod. François says that the starter does not have the force to bend a rod, and will usually jam to a stop when a piston tries to compress fuel. His advice is to bump a starter gradually if you suspect a filled cylinder. After the engine has done a couple of revolutions on the starter and did not jam, start the engine normally. If the starter jams to a stop, pull the plugs and turn the engine over. This will eject the fuel from the flooded cylinder, so you can attempt to start the motor.
Since cleaning the float needles on the 330 America, I’ve run about 160 miles on the motor, and I’ve had no leaks. As new fuel is run through the system, the old crap should be flushed out, and I should have less and less trouble. I hope.
Previous Restoration Day
Next Restoration Day
Home page
Blog

Forum

Resource
