
Ferrari 365GTC/4 Rod
7/31/07
365GTC/4 Rod

Francois and I began working on the GTC/4 again. It’s been a long wait for parts to be found to fix the bent rod in this engine. 
As Francois fitted the new/used piston pieces together, he found the piston pin to be bent, but luckily had one in his spares box.
The documentation for these cars is pretty thorough, and this page shows the specifications, and more importantly. the ring orientation. Francois gave me a quick lesson on how the shape of the ring profiles changed through the years, and how to recognize the old and new ring designs. There are a bunch of ways to make mistakes when putting a Ferrari engine together, and the rings can certainly be one way to screw up!
I spent so much time focusing on the left bank of the engine compartment with the bent rod, I forgot all about cleaning up the right valve cover gasket. With a four cam motor, there are a lot of gasket surfaces to clean. I spent a lot of time hunched over the right fender of this car scraping all the gasket material off the head. With every valve adjustment, all the carbs, intakes, and valve covers have to come off, not to mention the gasket scrapping. No wonder it takes several hours to do a valve adjustment on a GTC/4!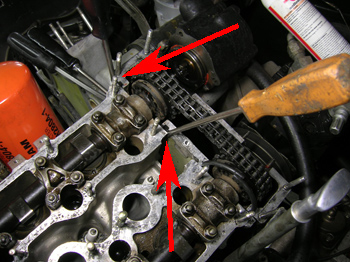
We found the front o-rings on this engine cut flush with the head and glued back in place, probably from a previous valve adjustment. V-12 engines are notorious for leaks between the front of the head to the timing case, and glueing in half a gasket to the top of the valve cover would only insure more leaks. Installing a full o-ring is usually thought to take an engine out proceedure, but Francois had a trick to show how to avoid taking the engine out for an o-ring. He even gave me permission to share this trick with you!
The first step is to loosen the nuts that secure the front of the timing case to the engine block and head. Carefully wedge the timing case to clearance the o-ring area (red arrows). On four cam motors, be very careful not to crack the delicate aluminum timing case. The two cam motors are sturdier and less apt to crack. Once the pressure is relieved from the o-ring, push the old one out, and lube the new one. Cut the new o-ring, and slide it through the channel until the cut end is placed at the 12 o’clock position. 
A light coat of silicone sealant also helps insure a good seal along the whole surface of the o-ring. You can see one o-ring installed, and when the chain cover is installed, it will be set inside the appropriate groove. Tighten everything back up, and you’ll be back in business without pulling the engine to replace these seals. You can send the money you saved from pulling the motor to me and Francois!
Dislaimer!! Only try this tip if you know what you are doing, and are willing to take the risk of cracking the timing case. There are risks involved in this proceedure, so proceed only if you understand what can happen if you break something!
Previous Restoration Day
Next Restoration Day
Home page
Blog

Forum

Resource
