
3553 Brake Booster and Fog Lights
11/26/08
3553 Brake Booster and Fog Lights

The gas tank is back from cleaning and coating, so it was time put it back in the car. I made a new cork gasket for the fuel sender and got it ready to put back on the tank.
I turned my attention to the brake booster. It works perfectly fine, but it was incorrectly detailed by the previous shop. The back half of the vacuum booster was painted hammertone gray, when it should have been in a clear cadmium plating, or nickel plate. 
You can see the paint peeling off the plated surface underneath.
Here’s a correctly finished and rebuilt booster on the right side of the picture. The correct finish is subtle, but if the judges notice, there could be points deductions.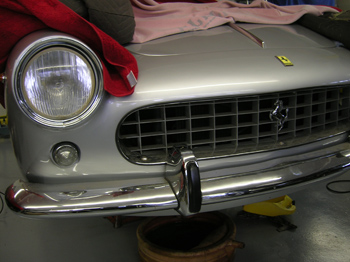
I’ve been spending a lot of time looking at this GTE. I try my best to spot what’s incorrectly painted, or even missing parts. In this picture, I noticed the horse emblem on the grille is incorrect. GTEs came with flat Cavallinos and later cars, like Series II 330s and I believe 275GTBs came with a horse cast in relief. I contacted Black Barts, an emblem supplier for an order. Looking again at the front of the car, something else was amiss, and I finally found what was wrong. Under two large bumper bolts covered the holes for the fog lamps! This Series II GTE is supposed to have fog lights mounted within the grille, and someone obviously put bumper bolts in place of the missing lights. 
Miraculously, François looked in his parts stash and found a complete set! I poked around behind the grille and found the cut wire for the fog lights, so I got some wire and made a new wiring harness for the lights. After we clean and polish the grille a little bit, the lights will go in.
Looking again at the car, I noticed another error in the assembly of the pieces. This vent is an supposed to be an air extractor and the louvers are supposed to face rearward, but the parallelogram shape of the grille allows someone to mount it upside down making the vents face forward. I made the same mistake on my car during reassembly, so we’ve all done it, but I now notice things like this. Luckily, none of the studs were broken, and flipping this grille was an easy fix.
After several days of paint stripping, I managed to take all the paint off the steering u-joint. The final steps for detailing this section is some new safety wire, and a yellow paint daub on the clamp bolt.
The next issue I have to address is the horn compressor. The one on the right came off of 3553, the car I’m working on. The one on the left is from a Lusso. 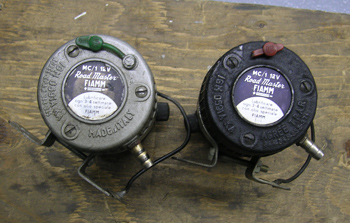
The pumps switched sides for this picture, so 3553’s pump is on the left, and the Lusso pump is on the right. I want to find out whether the gray hammertone found 3553’s pump is original, or simply painted by the previous shop along with the brake booster? If you have a horn compressor that looks like the gray one, e-mail me before I start stripping paint to make this one black. Also note that both of these compressors show MC/1 as the model number, but the oil fill plugs are different in color. Is the green plug an early model? My 330 America (5053) has a compressor that matches the black body with the red plug. 
The questions continue with the trumpets. Everything here, again, is painted in hammertone gray. I believe some horns were painted gray, but I’m not sure for this model. Most FIAMM horns I’ve seen have a candied red finish. I’ve collected some pictures for other cars and horns and they can be found in the Restoration Tips on Horns. Any input will be greatly appreciated, and will help collect more information for this section. Thanks!
Just a reminder, I’m looking for a new Vintage Ferrari Project. If you have, or know of a restoration project, please let me know. It would be great to restore another car on this website! My E-mail.
Previous Restoration Day
Next Restoration Day
Home page
Blog

Forum

Resource
