Vent Hose and Horn Paint
12/30/08
Vent Hose and Horn Paint

I wanted to share a couple more details on GTEs, and probably similar for some other Pininfarina built cars. The defroster hose was a special 40 mm I.D. hose that is wire reinforced and cloth wrapped. The stuff we found in 3553 was a plastic wire reinforced hose. Several years ago, I was contacted by a company in the U.K. that claimed to be reproducing the hose, but I have since lost that contact. Luckily, Geof Ohland of Partsource in Maine sourced us a short piece of similar hose to detail 3553, but if you are the vendor, or know of the vendor that is remanufacturing this hose, I’d love to hear from you. My e-mail.
Moving on to the horns. 3553’s horns were painted silver, and I questioned the originality of the color. Although some FIAMM horns were originally painted silver, I suspected otherwise with these. With the silver paint completely stripped, we found traces of red paint deep down inside the trumpet so my suspicions were confirmed. Now it was a matter of getting the right shade of red.
Some restoration shops that have in-house paint shops have mixed their own paint, but we don’t have that luxury. The time and expense to test, mix, and paint a set of horns is not what we want to do, so I’ve been looking for the right color in a spray can. The horns have a translucent red paint that has been described as a candy color, but the paints I’ve tried in the past have either been too purple, or too orange. 
Tim McNair of Grand Prix Concours e-mailed me with a tip on a paint that works for him when he’s preparing cars for shows. Thanks Tim!
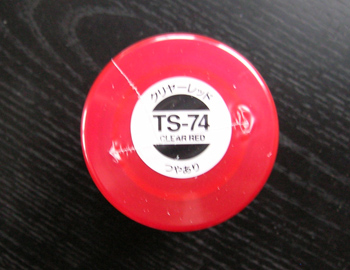
The color is called “Clear Red” and “TS-74” is made by “Tamiya.” I found it on the Internet from a hobby shop supplier.
The way I used to paint the horns was to buff the alloy horns to a bright shine before painting. I’ve found that after buffing my horns smooth, paint did not want to stick to the horns very well, so another tip was to paint the horns with silver paint. The reflective undercoat will help the translucent red paint give the right finish. 3553’s horns were a little nicked up, so painting them with a dull silver paint was the best option. With the first layer dry, I sprayed on the clear red paint. It was a little tricky to get just the right amount of paint so it would flow right, but not too much so it would run. I found two or three coats were enough paint to get the right intensity of the red. After the two coats dried, I tried a coat of clear paint to seal the red paint. I could have left just the red paint, but I’ve found hobby paints not very durable for the underhood environment. One problem I found, however, was if the first coat of clear was too thick, it would begin to dissolve the red paint! A light first coat of clear was needed to seal in the red layer before a heavier coat of clear could be applied. The final coats of clear needed to be heavy so the paint would dry smooth. The true test will be to see how everything dries. You never know when you mix different paints together how they will react when they dry. I’m keeping my fingers crossed.
As 2008 draws to a close, I want to wish everyone a Happy New Year. It’s been a good year for me and Vintage Ferraris, and I was happy to share it with you. The pledge drive is coming to a close and if you have not contributed, please do it soon. I will be posting a big thank-you-post to everyone who pledged on the next post.
Previous Restoration Day
Next Restoration Day
Home page


