
10799
10/20/10
10799: GTC Rust Repair and More Sorting

We found one little section of rust on a small frame member behind the front left wheel. This is a shot looking forward towards the front left side of the car. 
The rest of the chassis and floor on this car seem to be solid, but this area shows signs of swelling and rust damage. Since the car is at our shop for all sorts of maintenance, it was a good time to address this rot before it got any worse. I called my friend Jay over with his welder to assess the situation.
Of course after removing the undercoating and poking around, the rust was a little larger than it looked. I’ll have to remove some of the exhaust to get a welder in there. Jay’s plan is to cut out the section and fabricate a whole new square section. 
We’ll peel back the inner fender section by grinding out the original spot welds so we can weld all the way around the new frame piece. Jay has more experience working on Porsches, and is always blown away how crude the original Ferrari welds were done. I assured him this was the quality of the factory on the inner fender welds, so his work would easily exceed what was original. When we’re done, it’ll definitely be better than new.
An interesting fact on this car is the original paint was white! You can see this color under the scraped off undercoating. I got an excited e-mail from the owner after Marcel Massini confirmed the original color combination for 10799 was white with a red interior. After driving this car in it’s current livery for a few years, David plans to return her to the original colors. 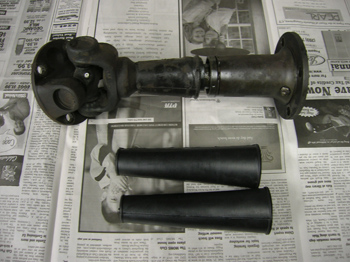
The half shaft boots came in the mail this week, so I got to work pulling the shafts apart. There are 36 ball bearings that slide in a splined shaft held in place with some c-clips and snap rings. The hardest part is not loosing a bearing in the grease while the part is being disassembled and reassembled. 
Even the new rubber boots can tear, and care needs to be taken not to rip them when stretching them on the shafts. Ferrari parts are not cheap, and mistakes and accidents are even more expensive! The U-joints on the half shafts felt great, so all that was needed there was some fresh grease. Doing it on the bench is a lot easier than on my back!
The engine compartment detailing is coming along nicely. As I was installing all the pieces, I noticed how dull the plastic balls that sit on the freshly painted valve covers. I put all four in my pocket and took them home for some polishing. The left one, though not perfect, looks much better than the one on the right without the polishing.
The engine compartment is coming together nicely. The valves have been adjusted, and the distributors timed in. Before the valve covers were installed, we checked the static timing with marks on the flywheel to make sure we had the correct range of adjustment in the distributors. All the covers were installed, and the bracketry was installed and adjusted. Now all we’re waiting for is the brake booster, fuel lines, and the work on the frame member to be finished. I dropped off a batch of parts for cad plating so with some luck, we’ll have them back in a week. Steady forward progress is my motto.
Reminder: If you’re looking for a Vintage Ferrari, or have a Vintage Ferrari for sale, please let me know. I would be happy to help you in any way that I can. I am not a broker, but occasionally hear of a good car for sale and can get them to the end user!
Previous Restoration Day
Next Restoration Day
Home page
Blog

Forum

Resource
