
8141
6/18/11
8141: Tune up and Oil Leaks.
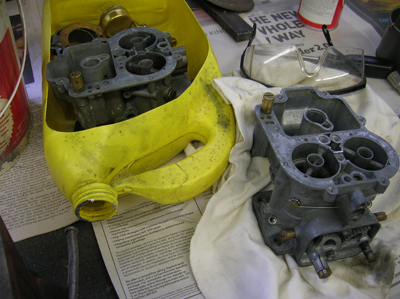
We took the newly purchased 330GT out for a drive, but before we could fill it up a low fuel tank, some trash must have gotten into the carburetors. No amount of adjustment would get the engine to run better, so we decided to take a closer look at the fuel system. New filters and a good carburetor cleaning was on order to avoid this from happening again. It was probably better to have had this happen to us than with the new owner on his first drive!
One known problem with this engine was an oil leak that we factored into the purchase price of the car. There was a possibility the timing chain case gasket was leaking, and this would require an engine out repair. I took a close look at the leak when I inspected the car and felt there was a 50/50 chance oil was actually coming from the timing chain case. When we received the car, I cleaned the oily areas thoroughly and went for a test drive. Francois felt we should address some of the other leaks before accusing the timing chain case and perhaps avoid a major three day job. One obvious leak was from one of the valve covers, so I pulled it off and resealed it with a new gasket. With the valve covers off, I adjusted the valves as well.
Another source of errant oil was coming from the oil filter housing and pressure regulator. That too was cleaned and sealed.
Since we adjusted the valves on one side of the engine, the owner asked us to go ahead and adjust the other side as well. The other side of the engine seemed to have been assembled at different time than the right side. The use of different gasket dressing gave me clues that perhaps things were done differently. The red sealant was pretty hard, didn’t seem to sealing anything very well, and was only found on the left cylinder. It looks a lot like red hylomar, but I thought that stuff isn’t supposed to harden? This had the consistency of shellac. 
The stuff used on the valve cover studs also made for getting the valve covers off a little difficult. The sealant locked the valve covers pretty well to the studs and required some heavy pulling to get them off. I made sure to clean all the studs before the valve cover went back on.
The sealant used on the timing chain covers was something else, but also hard and stuck in place. Careful chipping and scraping got this stuff off.
Another oil leak was coming from the steering box. A telltale sign of a leaking steering box is the collection of oil in the sway bar bushing bracket below the steering box. The oil drips out of the steering box, runs down the pitman arm, and into this area. 
Looking at the top of the steering box, I can see a real heavy steering oil oozing out of the breather hole. Steering boxes use 90 weight gear oil, but an old mechanic’s trick is to use real heavy oil for the steering box to minimize the leaks past the seals. This seal was so bad, even the heavy weight stuff was making it past the seals. 
I’m getting good at getting these steering boxes out, as I’ve pulled three of them in the last year, but I’m not getting any better at getting the $%#* cotter pin out from the bottom of the spindle. The cotter pin is in a very awkward position and every other one I’ve done can put up quite a fight. This steering box was one that decided to give a lot of trouble, but I eventually prevailed. The seals are on order, and we’ll get it all back together next week.
Reminder: If you have a Ferrari related project, car, or idea you’d like to explore, I’d love to talk to you. I can also help if you’re thinking of buying or selling. This website represents what I love to do, share, and how I make a living, so if you’d like to do something together, let me know. It all begins with an e-mail!
Previous Restoration Day
Next Restoration Day
Home page
Blog

Forum

Resource
