
365GT 2+2 Fuel Tanks and Windows
4/30/14
365GT 2+2 Fuel Tanks and Windows

I got the fuel tanks back from getting sealed. If you remember, I had a small pinhole welded in one of the tanks, but we decided the best thing was to have both tanks sealed internally to avoid future fuel leaks from corrosion. 
A new filler pipe was cut and fitted. The old one was the original piece and was pretty brittle. 
With the fuel tanks installed, I wanted to check the fuel sender to make sure it was working and sending the appropriate signal to the fuel level gauge. I found the low level light was working from the sender, but the float level was not working. I’ll have to sender fixed and rebuilt. 
The new filler pipes were installed, and I fabricated a new yellow fuel line that leads from the bridge pipe to the first fuel filter. With these parts installed, the rear portion of the fuel system on this car will be all new. 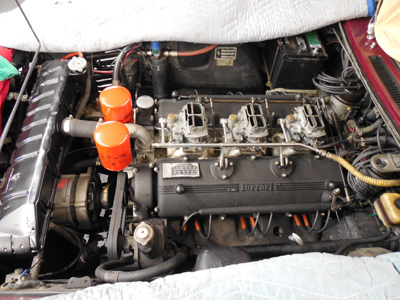
The engine was also coming along nicely. The newly cored radiator was installed, along with new power steering cooler hoses and belts. Once the fuel sender is back from my gauge guy, I’ll be able to fill the system with some fuel and fire her up!
There is still the window to deal with on this car, however, but I’m making progress. My friend Zac Dugger sent me some parts from a donor car to hopefully complete the missing pieces in this 365. 
Along with a window motor assembly, he also sent me a cable tensioning pulley that this car was missing. I’m trying my best to re-string the cable to the window mechanism without ending up with a rat’s nest of wire rope. So far, so good!
There are signs of butchery and modifications all over this car, and much of it does not make any sense. There were two sets of holes for the window motors in this door, but the ones that lined up with the motor Zac sent didn’t line up with the access hole for the manual winder. I’ll have to cut a new hole and see if I can make one set work for this car. 
Progress is also being made on the fuse panel. Zac also sent me a pretty good fuse block to replace the one that was worn out. I had to methodically remove each circuit, label it, and reinstall it to the new fuse block. With everything back in place, I carefully tested each circuit. After I got most of them working, I had to go back and fix the changes the previous owner made to bypass the bad junctions. 
We also found an Ammeter to replace the missing one on this car. With a couple of modifications, we had it installed in its new home!
I’ve been working hard and heavy trying to get a 330GT ready for the Radcliffe/Tomyang.net car show, but I guess it was not meant to be. At the eleventh hour, we found a problem with the oil pressure gauge on the instrument cluster. After checking pressure readings with another more accurate gauge, we determined it was the fault of the instrument cluster. Running out of time to fully test the engine, we decided it was safer to fix the problems with the gauge, and miss the show deadline. The owner understood the risk we were not comfortable with taking, and it was in everyone’s interest to fix and test the car properly.
Save the Date! The 7th Annual Radcliffe/Tomyang.net Spring Car Show Saturday May 3rd 2014 celebrating the 50th Anniversary of the Introduction of the 330GT!
Spectators are free, but Registration of show cars are limited for a small fee. Details can be found on the Radcliffe Website.
You can also call Richard Garre at:
Radcliffe Motorcars
12340 Owings Mills Boulevard
Reisterstown, Maryland 21136
Phone: 410-517-1681

Reminder: If you have a Ferrari related project, car, or idea you’d like to explore, I’d love to talk to you. I can also help if you’re thinking of buying or selling. This website represents what I love to do, and now it’s how I make a living, so if you’d like to do something together, let me know. It all begins with an e-mail!
Previous Restoration Day
Next Restoration Day
Home page
Blog

Forum

Resource
