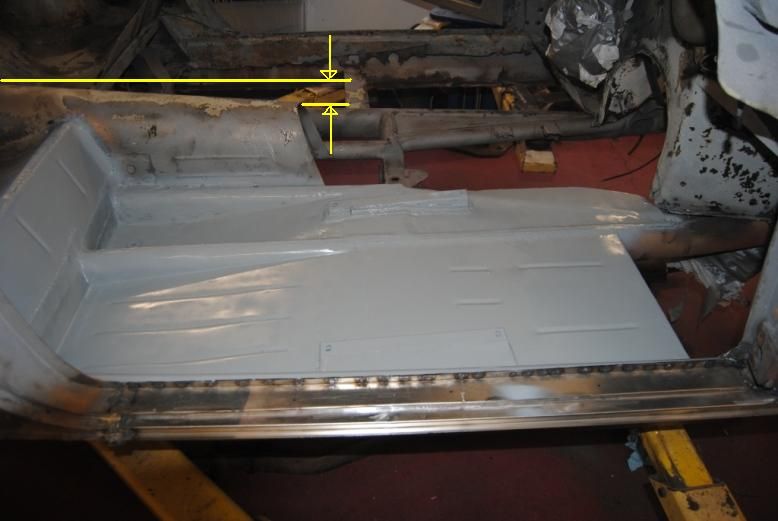
Greetings… on 5769 First measurement-horizontaly from plumb line to wheel edge Left 1 1/4 in Right 1 7/16 inch
Second measurement from horizontal down to top of wheel arch Left 7 1/16 in Right 7 1/4 in
These may have been stampings but they were finished by hand. The wheel arch edge is a wired edge. Most likely the factory had some one cut the opening buy hand from a template the roll and wire the edge. This would account for differences. Friday car vs Monday car. Before lunch vs after lunch. etc.
Tim
330GT 2+2 Bodyshell Rebuild
Re: 330GT 2+2 Bodyshell Rebuild
1964 330GT 5769 -the big yellow taxi 61&66 Morgan +4's Daimler SP250 Turner 950S and some other dull stuff plus a brand Mercedes C300 4matic
Re: 330GT 2+2 Bodyshell Rebuild
Thanks Tim,
Great information.
So far this seems to indicate a tolerance of around 3/8" to 1/2" on the bodywork of a 330.
Can anyone else confirm this?
It would be good to have this authenticated/documented.
Great information.
So far this seems to indicate a tolerance of around 3/8" to 1/2" on the bodywork of a 330.
Can anyone else confirm this?
It would be good to have this authenticated/documented.
330GT 2+2 4HL 6727
Small things make perfection, but perfection is no small thing.
Small things make perfection, but perfection is no small thing.
-
Suebian330
- Posts: 91
- Joined: Fri Apr 25, 2008 4:10 pm
- Location: Germany, Stuttgart Area
Re: 330GT 2+2 Bodyshell Rebuild
Darren,
I admire you to tackle this big task to complete this 330.
When reading your post I also was interested to measure at my car #8741 330 Series2 the differences from left to right.
Here my results:
Front left 42,8 - Front right 43,6
Rear left 22,7 - Rear right 23,3 all measures in mm
My car is just sitting on the lift without wheels so I took for reference at the front the inner pivot of the upper wishbones.
For the rear my reference was the brake disks. So overall no big discrepancy. The bodyshell structure of my car is original. No wing repairs.
Dieter from Germany
[b]Suebian330
#8741 330 GT2+2[/b]
#8741 330 GT2+2[/b]
Re: 330GT 2+2 Bodyshell Rebuild
Thanks Dieter,
I think some cars are much better than others, and some must have simply been "got at" by previous owners!
I've just finished the front body supports to the chassis and engine bay inner wings, so I'm now looking at making the missing centre tunnel inside the car over the next few weeks.
Between the rear seats I have a reference from where the old one was cut out, but need a few measurements to make an accurate replacement.
The tunnel seems in Cory's picture to angle down towards the front. I would like to know by how much?
Also the height at the front from chassis rail to top of tunnel and the width at the bottom.
As I do not have access to another 330, can anyone help?
Thanks in advance.
I think some cars are much better than others, and some must have simply been "got at" by previous owners!
I've just finished the front body supports to the chassis and engine bay inner wings, so I'm now looking at making the missing centre tunnel inside the car over the next few weeks.
Between the rear seats I have a reference from where the old one was cut out, but need a few measurements to make an accurate replacement.

The tunnel seems in Cory's picture to angle down towards the front. I would like to know by how much?
Also the height at the front from chassis rail to top of tunnel and the width at the bottom.
As I do not have access to another 330, can anyone help?
Thanks in advance.
330GT 2+2 4HL 6727
Small things make perfection, but perfection is no small thing.
Small things make perfection, but perfection is no small thing.
Re: 330GT 2+2 Bodyshell Rebuild
Darren,
The measurements are as follows: using a level the difference in height from rear to front is 3 5/8".
The tunnel is 35 3/4"inch along the top
It is 6 1/4" wide at the frame rails
The mouth of the tunnel is 7 1/8" tall
Cory
The measurements are as follows: using a level the difference in height from rear to front is 3 5/8".
The tunnel is 35 3/4"inch along the top
It is 6 1/4" wide at the frame rails
The mouth of the tunnel is 7 1/8" tall
Cory
Re: 330GT 2+2 Bodyshell Rebuild
Thanks Cory,
You are yet again a Godsend!
You are yet again a Godsend!
330GT 2+2 4HL 6727
Small things make perfection, but perfection is no small thing.
Small things make perfection, but perfection is no small thing.
Re: 330GT 2+2 Bodyshell Rebuild
Today I made a cardboard template for the Centre Tunnel. This highlighted quite a lot of issues with not having any reference points in the big hole where my cars floor used to be.
I suppose what I need is to measure and record a 330’s floor to make sure I get it right. (It’ll be an expensive mistake if it turns out wrong!)
I would like to make a complete cardboard mock-up first to iron out any issues before the first steel sheet is cut, so would be grateful for the following measurements.
This is a big ask I know, but I’ve got to ask!
Below are 20 measurements as follows
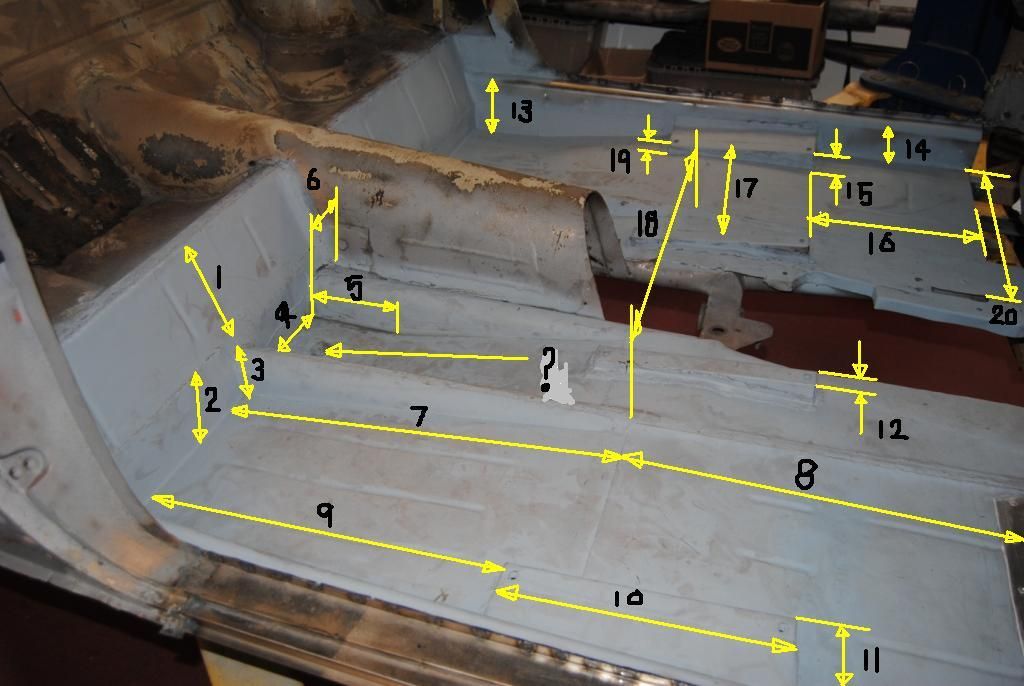
1. Angled section height
2. Vertical section height
3. Height of tube at its highest point
4. Width of the flat section of floor
5. Length of the flat floor
6. Width of the step (also does it taper? Looks wider at the rear in the photo?)
7. Length of sloping section of the floor
8. Length of flat floor
9. Distance from back of seat support to vertical floor
10. Length of seat support
11. Width of outer seat supports
12. Width of inner seat supports
13. Height of inner sill at tallest point (depth of deep floor)
14. Height of inner sill at shortest point (depth of shallow floor)
15. Height of seat support at front
16. Distance seat support to end of steel floor
17. Width between seat supports
18. Width of the tubes at Centrelines
19. Height of seat support at rear
20. Distance to edge of handbrake hole from inner sill.
? I also have a question about the threaded plug (or what looks like a threaded plug in the floor? Size? Purpose?)
I cannot express how grateful I would be for any of the above measurements.
Thanks in advance
330GT 2+2 4HL 6727
Small things make perfection, but perfection is no small thing.
Small things make perfection, but perfection is no small thing.
Re: 330GT 2+2 Bodyshell Rebuild
For some reason the RH side of the picture appears cropped when I view it, so if anyone has a problem seeing measurement 20, just left click on the image. Thanks.
330GT 2+2 4HL 6727
Small things make perfection, but perfection is no small thing.
Small things make perfection, but perfection is no small thing.
Re: 330GT 2+2 Bodyshell Rebuild
Darren C wrote:Today I made a cardboard template for the Centre Tunnel. This highlighted quite a lot of issues with not having any reference points in the big hole where my cars floor used to be.
I suppose what I need is to measure and record a 330’s floor to make sure I get it right. (It’ll be an expensive mistake if it turns out wrong!)
I would like to make a complete cardboard mock-up first to iron out any issues before the first steel sheet is cut, so would be grateful for the following measurements.
This is a big ask I know, but I’ve got to ask!
Below are 20 measurements as follows
1. Angled section height
2. Vertical section height
3. Height of tube at its highest point
4. Width of the flat section of floor
5. Length of the flat floor
6. Width of the step (also does it taper? Looks wider at the rear in the photo?)
7. Length of sloping section of the floor
8. Length of flat floor
9. Distance from back of seat support to vertical floor
10. Length of seat support
11. Width of outer seat supports
12. Width of inner seat supports
13. Height of inner sill at tallest point (depth of deep floor)
14. Height of inner sill at shortest point (depth of shallow floor)
15. Height of seat support at front
16. Distance seat support to end of steel floor
17. Width between seat supports
18. Width of the tubes at Centrelines
19. Height of seat support at rear
20. Distance to edge of handbrake hole from inner sill.
? I also have a question about the threaded plug (or what looks like a threaded plug in the floor? Size? Purpose?)
I cannot express how grateful I would be for any of the above measurements.
Darren,
I will work and on these and get them too you
Coru
Thanks in advance
Re: 330GT 2+2 Bodyshell Rebuild
I will work on these and get them to you.
Cory
Cory
Re: 330GT 2+2 Bodyshell Rebuild
Darren,
Here you go,
1: 5 3/4"
2: 3 3/8"
3: 3"
4: 6 1/2"
5: 5 1/2" Hard to see in the picture but this flat section is carried all the way across to the inner sill.
6: 2", The seat belt mount is there on the tunnel and ties into the floor making it appear to being wider. Just some extra material there is all.
7: From the 5 1/2" flat section it measures 16"
8: 18"
9: 19 3/16"
10: 12 1/4"
11: 4 1/4"
12: 1 1/2"
13: 5/8"
14: 3 1/2"
15: 1 1/2" in the front and 1" in the rear. Both drivers and passenger are the same.
16: 8 1/2"
17: 15 5/8" inside to inside, 17 1/16" to the center of the bolt mounting holes.
18: 26"
19: Same as measurement 15.
20: 21 5/8"
I think the "plug" your refering to is in the flat 5 1/2" section to the inside of the rear floor. If so it is a rubber plug. They are on both sides of the tunnel and go thru both sections of floor. Unknown what it is for other than a possible drain point?
Cory
Re: 330GT 2+2 Bodyshell Rebuild
Cory,
I am eternally grateful!
If you are ever in the UK, let me know (I live a couple of miles from Goodwood, have you ever been?)
PM sent.
Kindest regards
Darren
I am eternally grateful!
If you are ever in the UK, let me know (I live a couple of miles from Goodwood, have you ever been?)
PM sent.
Kindest regards
Darren
330GT 2+2 4HL 6727
Small things make perfection, but perfection is no small thing.
Small things make perfection, but perfection is no small thing.
Re: 330GT 2+2 Bodyshell Rebuild
That's what this site is all about. Pay it forward.
Cory
Cory
Re: 330GT 2+2 Bodyshell Rebuild
Will do Cory, Thanks.
I have plans to make several new grilles and have several check strap pins ready to go, just need to know if anyone has bearing washers on their checkstraps. (see my thread on these)
Cory can you kindly check size 13 please.
To update you all on my progress:
With winter well and truly here, progress has been slow. The UK has been hit with constant rain and storms. I live on the South coast and the storms have been relentless. We have had the greatest rainfall in December & January since before records began and our village has been constantly flooded in places.
Trying to rebuild a 330 outside in this weather has been ridiculous. I had no option as the car is immobile but to build a temporary garage around the car.
Again I had no money to do this with, so had to be a bit creative.
After much thought and what started as a joke comment from a friend I purchased 10 damaged 6ft x 6ft featherboard garden fence panels at £5 each.
Searching around the local timber yard I got some floorboard seconds for another £50 and finally on a sale weekend at B&Q (UK hardware store) I got some mini profile roof sheets for £4 each.
I spent the next two weeks in wind and rain, stripping and repairing the fence panels, and bolting them together with my 15 year old son. We dragged the shell out onto the roadway and laid the floor in 45 minutes then dragged the shell back onto it. Next we built the fence panel walls. I used some old stud wall 3 x 2 to make the trusses and some roof tile batten to attach the mini profile roof sheets. The remaining featherboard strips were attached to cut fence panel frame timber to make the doors and infill the gables.
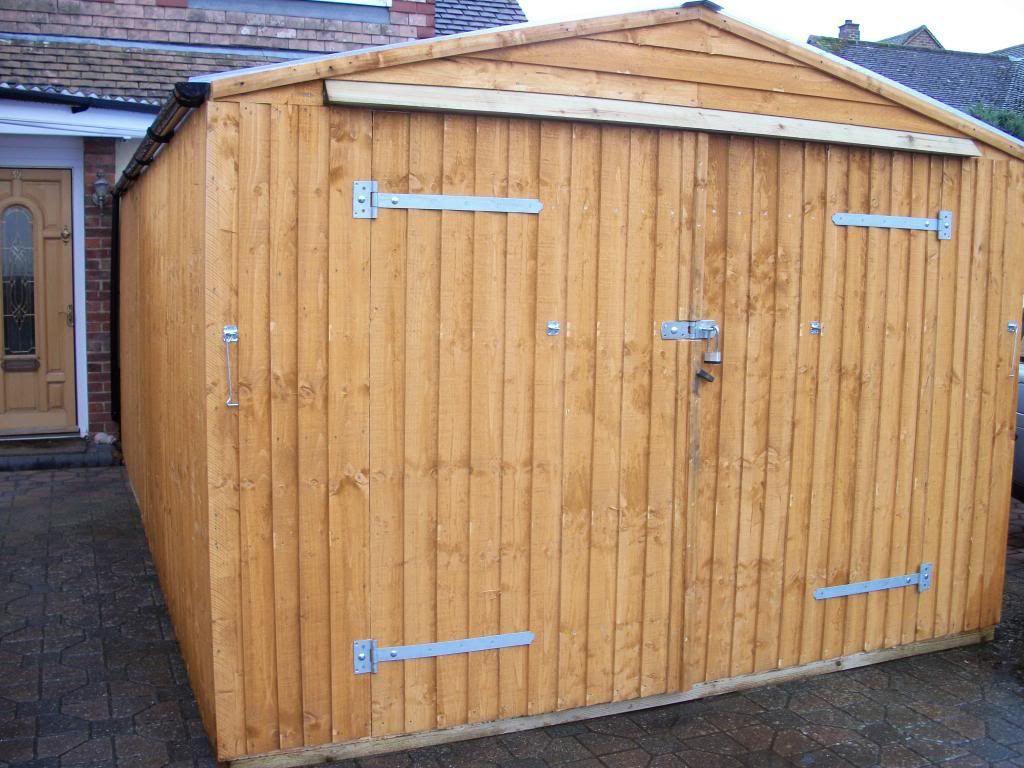
So all in all I built a complete garage 19ft x 11ft in front of my house for about £200!
The finished Garage
Dry Inside
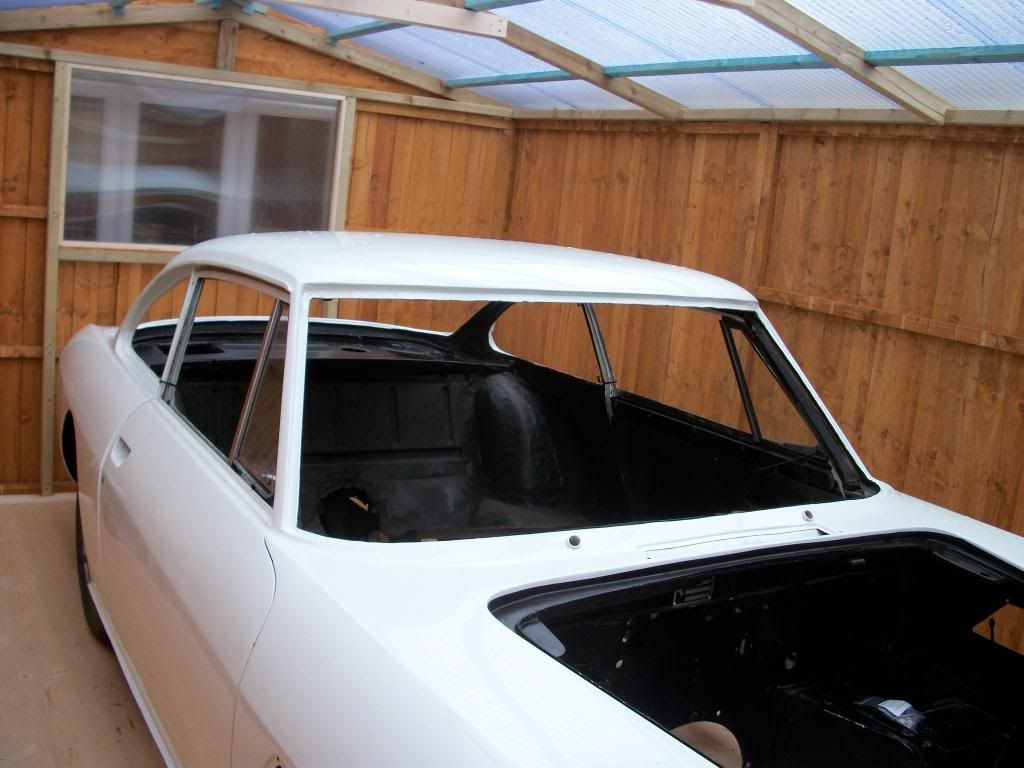
It’s fantastic to work out of the rain.
Unfortunately it’s tight to my house and blocked all light into my living room, so the following weekend I got a £5 perspex sheet and cut a window in the back. Light comes through the roof sheets through the window and into the living room now, so it’s not so bad. Nice to draw the curtains and see the car!
Ok, ok, yes the neighbours have gone mental, but I visited the local town planning enforcement officer before I built it and with a little research into what constitutes a “temporary” structure, I have made sure it met the criteria, so for now they can complain all they like without too much trouble. Obviously it’ll have to come down when the cars finished but for now it’s a real bonus to me.
I have plans to make several new grilles and have several check strap pins ready to go, just need to know if anyone has bearing washers on their checkstraps. (see my thread on these)
Cory can you kindly check size 13 please.
To update you all on my progress:
With winter well and truly here, progress has been slow. The UK has been hit with constant rain and storms. I live on the South coast and the storms have been relentless. We have had the greatest rainfall in December & January since before records began and our village has been constantly flooded in places.
Trying to rebuild a 330 outside in this weather has been ridiculous. I had no option as the car is immobile but to build a temporary garage around the car.
Again I had no money to do this with, so had to be a bit creative.
After much thought and what started as a joke comment from a friend I purchased 10 damaged 6ft x 6ft featherboard garden fence panels at £5 each.
Searching around the local timber yard I got some floorboard seconds for another £50 and finally on a sale weekend at B&Q (UK hardware store) I got some mini profile roof sheets for £4 each.
I spent the next two weeks in wind and rain, stripping and repairing the fence panels, and bolting them together with my 15 year old son. We dragged the shell out onto the roadway and laid the floor in 45 minutes then dragged the shell back onto it. Next we built the fence panel walls. I used some old stud wall 3 x 2 to make the trusses and some roof tile batten to attach the mini profile roof sheets. The remaining featherboard strips were attached to cut fence panel frame timber to make the doors and infill the gables.
So all in all I built a complete garage 19ft x 11ft in front of my house for about £200!
The finished Garage

Dry Inside

It’s fantastic to work out of the rain.
Unfortunately it’s tight to my house and blocked all light into my living room, so the following weekend I got a £5 perspex sheet and cut a window in the back. Light comes through the roof sheets through the window and into the living room now, so it’s not so bad. Nice to draw the curtains and see the car!
Ok, ok, yes the neighbours have gone mental, but I visited the local town planning enforcement officer before I built it and with a little research into what constitutes a “temporary” structure, I have made sure it met the criteria, so for now they can complain all they like without too much trouble. Obviously it’ll have to come down when the cars finished but for now it’s a real bonus to me.
330GT 2+2 4HL 6727
Small things make perfection, but perfection is no small thing.
Small things make perfection, but perfection is no small thing.
Re: 330GT 2+2 Bodyshell Rebuild
We will be at the Goodwood Revival this year. Perhaps you could email me: GT330@comcast.netDarren C wrote:Cory,
I am eternally grateful!
If you are ever in the UK, let me know (I live a couple of miles from Goodwood, have you ever been?)
PM sent.
Kindest regards
Darren
Lowell Brown
1966 Gold 330 2+2 Series II
1966 Gold 330 2+2 Series II